Installing my first motorized C Band Satellite Dish (w/pictures)

  • Server Issues.

    We are very aware that there have been system issues the past few days. In troubleshooting the system, it has been determined that the issue is at our provider and is hardware related. As of 12:05 PM ET our provider has moved us to a new server.

    Things seem to be running better on this new server. However in trying to diagnose the issue (before finding out it was a hardware issue) we made some system changes which we need to undo. So if you find any issues or errors please let us know in the Operations Center Forum.

    Thank you for your patience! Sorry for the issue!
    CLICK THE X IN THE TOP RIGHT CORNER OF THE BOX TO DISMISS THIS MESSAGE
Status
Please reply by conversation.
Thank you Jason S and gpflepsen i will do it exactly as per your instructions.

But that will be until next monday, i have to wait all this days (5 days) to let the concrete dry itself.

Really, thank you everybody for helping me with my C Band installation.

RamboHack
Monterrey, Mexico
 
UPDATE:

Look what UPS left at my house today! :clapping

A brand new 36" Actuator (Venture) for my new 10' dish mesh:

DFY9ZOG.jpg


Also recieved a military compass to point my dish exactly at my true south (not magnetic south):

L4eYN1b.jpg


Now im all set, I have everything i need to perform this installation. Next week, will be the "good" one, God willing.

:crowdbounce

RamboHack
Monterrey, Mexico
 
Hi, i used this Sunday to cover my concrete pad with.... i dont know how to say this in english, but in spanish is "impermeabilizante" which is like a paste or cream you put above the concrete to prevent water comnig inside your house.

I put 2 layers of "impermeabilizante" in my new concrete.

Maybe tomorrow i'll start with the installation of the pole if the weather allow me.

3ZCyxKq.jpg


RamboHack
Monterrey, Mexico

You waterproof sealed your concrete before it's completely cured? Cement pads such as that take a LOT longer than 1 week to completely cure. Sealing it before that point could end up damaging it or causing it to become brittle.

I know you're very anxious to get everything up and running, but don't be in so much of a hurry that you'll end up having to redo things. The satellites aren't going anywhere.

:( The guy who made the concrete pad, told me he used something called "concrete accelerator", he told me that this product, accelerates the cure of the concrete. He said 4-5 days and its cured.

He used something like this:
sakrete-adhesives-fortifiers-65055001-64_1000.jpg
 
:( The guy who made the concrete pad, told me he used something called "concrete accelerator", he told me that this product, accelerates the cure of the concrete. He said 4-5 days and its cured.

He used something like this:
sakrete-adhesives-fortifiers-65055001-64_1000.jpg

I know this sounds crazy, but concrete takes years to completely cure. I've never used the accelerator, but it speeds up the time before you can actually put the concrete into use. I'd keep an eye on it for a while to see how it reacts to a sealer. When I poured my garage floor, I kept a fine mist of water spraying on top of the floor for three weeks before I built the building on it. The hardness of concrete also depends on how many bags of Portland Cement goes into every mix.

The more Portland, the harder the mix. I used 6 bags to each yard on this floor, and so far, no cracks, but it has stress joints in it too. It's 24X24 feet, 8 inches thick. Primestar is correct. Not sure how it will react being sealed this soon. If I had to guess, it may crack the sealer and make it peel off.
 
  • Like
Reactions: RamboHack
I went to the roof today and i put the pole in its place.

I tried to make it as plumb as i could, but it is VERY hard to do it at exactly 90.0 degrees.

I put the inclinometer at 3 diferent sides, south side, northwest side, and northest side, and gave me 3 different lectures, 89.8, 90.0 and 89.9.... thats the best i got :(

One problem i had, is when i place the inclinometer ABOVE the mast pole, it read 0.06-0.05 degrees instead of 0.0 degrees. If i try to align this pole to 0.0 degrees, then the vertical pole went to 90.3 - 90.5 degrees and not 90.0.

Which is more important? the vertical degrees? i mean the 90.0 or the horizontal degree 0.0?

Am i gonna have a problem if my horizontal degree is 0.5 or 0.6?

asMnkDt.jpg

0jLUrQQ.jpg

aIyDoOv.jpg

zGWwiTr.jpg

Ns8hmNF.jpg

CCFM8JI.jpg


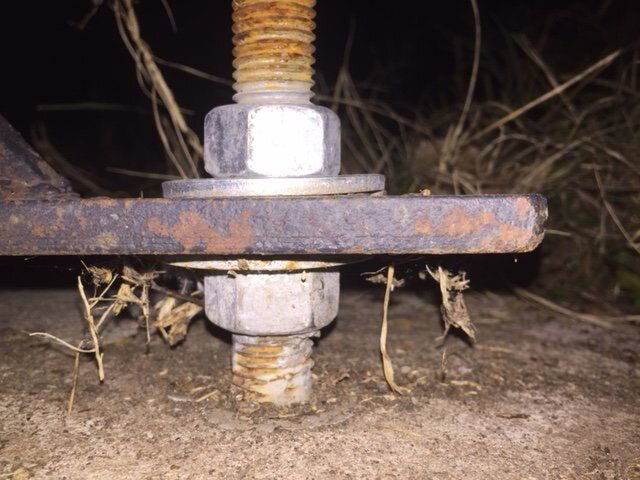
I also followed your advices and put 3 washers under one side of the pole to make it as leveled as possible.

And i also put, the antiseize in the ground bolts... what a mess i did :eek: but i guess the bolts are protected now hehehe.

Hope i will not have a problem with the 0.5 horizontal degree, the vertical degrees i guess they are fine right? 89.9-90.0 is the best i got.

Thank you for all your advices and recomendations.

RamboHack
Monterrey, Mexico
 
Last edited:
If you were to have a nut above and below the pole mounting bracket, then you'd have adjustments to fine tune for plumb. It looks like you have enough thread on the concrete embedded mounting bolts that you could simply add another nut.

IMG_1516.JPG

On the polar mount, my thinking is to have all the bolts equally threaded into the welded nuts. Then turn each bolt in equal turns until the mount becomes snug onto the pole. Once polar mount bolts are all snug, check for plumb and make any adjustments needed on the pole mount nuts.

Better to have everything as close to 0.0° (or 90.0°) as possible now to eliminate any variables later.
 
I went to the roof today and i put the pole in its place.

I tried to make it as plumb as i could, but it is VERY hard to do it at exactly 90.0 degrees.

I put the inclinometer at 3 diferent sides, south side, northwest side, and northest side, and gave me 3 different lectures, 89.8, 90.0 and 89.9.... thats the best i got :(

One problem i had, is when i place the inclinometer ABOVE the mast pole, it read 0.06-0.05 degrees instead of 0.0 degrees. If i try to align this pole to 0.0 degrees, then the vertical pole went to 90.3 - 90.5 degrees and not 90.0.

Which is more important? the vertical degrees? i mean the 90.0 or the horizontal degree 0.0?

Am i gonna have a problem if my horizontal degree is 0.5 or 0.6?

asMnkDt.jpg

0jLUrQQ.jpg

aIyDoOv.jpg

zGWwiTr.jpg

Ns8hmNF.jpg

CCFM8JI.jpg


I also followed your advices and put 3 washers under one side of the pole to make it as leveled as possible.

And i also put, the antiseize in the ground bolts... what a mess i did :eek: but i guess the bolts are protected now hehehe.

Hope i will not have a problem with the 0.5 horizontal degree, the vertical degrees i guess they are fine right? 89.9-90.0 is the best i got.

Thank you for all your advices and recomendations.

RamboHack
Monterrey, Mexico

A home satellite dish installation is setup and based on a pole for movement true EAST-WEST and NORTH-SOUTH. Think of placing a 4-sided box centered on your cement slab. Now, orient each side facing each direction, East, West, North and South.

THOSE are the 4 sides that you should put your angle gauge on, and MUST be exactly 90.0 degrees at the TOP of the pole! Once you get the pole perfectly set, you then put the polar mount on it, and that part ALSO must be at 90.0 degrees on those same sides. As Jason S said, use a nut UNDER the pole mounting plate, and a nut on TOP of the plate. Follow his other instructions also.
for leveling the polar mount (which can also be shimmed if you must).

You MUST spend time and get this part perfect. I repeat, you MUST spend time and get this part perfect. If not, you will go through Hell to try to compensate for all the problems you will have, and it may never work right across the whole arc. This is the true measure of your seriousness in learning how to install a dish system. If you don't take the time to get this part perfect, you'll end up wasting all your time for a messed up system.

I can't stress the above info strong enough! I'm a little OCD, but I've installed many C and KU systems over 33~ years, and getting the pole installed correctly the first time eliminates a lot of heartache and pain.
 
Which is more important? the vertical degrees? i mean the 90.0 or the horizontal degree 0.0?

East-West is the most essential.
That is, the pivot around which the dish is turning should be absolutely perpendicular to east-west.
Only then the pivot can be set exactly parallel to the polar axis.

North-south deviation from 90 degrees, if needed, can be corrected with the axis elevation.

greetz,
A33
 
I went to the roof today and i put the pole in its place.

I tried to make it as plumb as i could, but it is VERY hard to do it at exactly 90.0 degrees.

I put the inclinometer at 3 diferent sides, south side, northwest side, and northest side, and gave me 3 different lectures, 89.8, 90.0 and 89.9.... thats the best i got :(

One problem i had, is when i place the inclinometer ABOVE the mast pole, it read 0.06-0.05 degrees instead of 0.0 degrees. If i try to align this pole to 0.0 degrees, then the vertical pole went to 90.3 - 90.5 degrees and not 90.0.

Which is more important? the vertical degrees? i mean the 90.0 or the horizontal degree 0.0?

Am i gonna have a problem if my horizontal degree is 0.5 or 0.6?

asMnkDt.jpg

0jLUrQQ.jpg

aIyDoOv.jpg

zGWwiTr.jpg

Ns8hmNF.jpg

CCFM8JI.jpg


I also followed your advices and put 3 washers under one side of the pole to make it as leveled as possible.

And i also put, the antiseize in the ground bolts... what a mess i did :eek: but i guess the bolts are protected now hehehe.

Hope i will not have a problem with the 0.5 horizontal degree, the vertical degrees i guess they are fine right? 89.9-90.0 is the best i got.

Thank you for all your advices and recomendations.

RamboHack
Monterrey, Mexico

There's something else to take into consideration. The quality of the digital protractor plays into it. The one I have, I gave $300 for it back in 1986. It is guaranteed accurate to 1/10 of a degree no matter which way you have it turned, and I've actually checked it and found it to be that accurate. However, it can be off too if it's not calibrated properly. Of course, the more plumb the pole, the better, but, you can run into a situation where the mount itself wasn't manufactured correctly.

Most of the time you can correct this by doing the final adjustment on the tubing that slips over the pole. I do it by adjusting the bolts that lock the dish to the pole by making fine adjustments until its plumb of all sides. If you need to turn the dish slightly, loosen the bolts on the load side of the mount slightly until you can move the dish left or right. When I am done tightening the bolts, I check it again for plumb. It works well for me. Yours should have came with instruction on how to calibrate it.
 
  • Like
Reactions: RamboHack
Thank you guys! I really apreciate all your words and advices.

I'll continue with my installation this afternoon and will try to do what you just told me


One quick question guys:

If my longitude is 100.3, which should be my Zenith satellite? Galaxy 99w? or Ses 101w?

I think 101 right?

Which is the strongest 101w transponder i could use (today or tomorrow) to easily locate that satellite?

Could you help me please, giving me most current Tp and the frecuency of that satellite, i just need one tp (the strongest) not all of them.


Thank you


RamboHack
Monterrey, Mexico
 
That is close enough that you could use either of them. If you use 101 you need a good qpsk transponder that is easy to lock.

Try....

3773 Vertical SR 4442 Fec 3/4 [or auto]

It's a religious channel that is very easy to lock.

Another one you could try is;
3953 Vertical SR 2734 Fec 3/4 [or auto]

That one is the heros and icons channel.
 
  • Like
Reactions: wvman
That is close enough that you could use either of them. If you use 101 you need a good qpsk transponder that is easy to lock.

Try....

3773 Vertical SR 4442 Fec 3/4 [or auto]

It's a religious channel that is very easy to lock.

Another one you could try is;
3953 Vertical SR 2734 Fec 3/4 [or auto]

That one is the heros and icons channel.


Thank you very much Arion ! :hatsoff
 
Thank you guys! I really apreciate all your words and advices.

I'll continue with my installation this afternoon and will try to do what you just told me


One quick question guys:

If my longitude is 100.3, which should be my Zenith satellite? Galaxy 99w? or Ses 101w?

I think 101 right?

Which is the strongest 101w transponder i could use (today or tomorrow) to easily locate that satellite?

Could you help me please, giving me most current Tp and the frecuency of that satellite, i just need one tp (the strongest) not all of them.


Thank you


RamboHack
Monterrey, Mexico

It looks like 101W should be nearest to true north and south for you. Grit TV is on Frequency 4180, Horizontal, Symbol Rate 30000. If you pick 101W, SES1 from your satellite list and go to transponder information, 4180 should be listed. If it isn't, you can add it to the list. If it doesn't show 4180, Horizontal and 30000 for the symbol rate, edit it and correct it.

Then you can move the dish to its highest point, with the elevation set correctly, the signal meter should show a signal when you hit the satellite. May have to bump the dish left or right slightly with the motor control to get it peaked. Once you have it peaked, you can do a scan and Grit should pop in. Once you have Grit working and confirmed, "It will say "Grit" in the lower right corner of the screen", you can do a blind scan and it will find all the other channels.

I never scan for subscription channels. I always have it search for FTA only, but that's up to you. Once you have this done, you can turn the dish slightly on the pole left or right to peak out the signal. When it's at it's max, bump the motor a few counts left and right until it's peaked out again. This should get you the highest signal you're going to get. You may have to play with both settings to find the sweet spot. It should then track all the satellites. Hope this helps. I did this will all five of my dishes and it worked great.

Very good explanation Wvman! thank you very much! I will try 101 or 99w whichever comes first hehehe.

But first i have to install the actuator and mount the 4 dish panels tonite.

I'll post some pictures as my installation progress.

Thank you for all your help.

RamboHack
Monterrey, Mexico
 
  • Like
Reactions: wvman
Very good explanation Wvman! thank you very much! I will try 101 or 99w whichever comes first hehehe.

But first i have to install the actuator and mount the 4 dish panels tonite.

I'll post some pictures as my installation progress.

Thank you for all your help.

RamboHack
Monterrey, Mexico

Not a problem. You're doing great so far. I know you're anxious to get it working, but the name of the game is taking your time to avoid mistakes. A smooth installation makes the whole operation much more enjoyable. :) Have a great evening.
 
  • Like
Reactions: RamboHack
UPDATE:

I spent 3 hours @ the roof today, building the dish panels.

It is a very, not difficult, but time consuming job, putting all the bolts and the nuts in their place. :reading

But i finally did it!:happydance all by myself.... i mean with your help guys, but all the hard work by myself.

Here's some pictures of my 10 ft brand new dish:

Is NOT finished yet, but im getting closer :)

BJaMv9P.jpg

FXoMPJ1.jpg

OMzdvWJ.jpg

kwKmy6d.jpg


And thats all i did today. Night has fallen and i couldnt go on. But i have more days to continue, like wvman said "The name of this game is taking my time to avoid mistakes" :clapping:)

If i have time tomorrow i'll put the rods and the Titanium LNB in its place, if not, friday will be, God willing.

Thank you guys! im very excited about my new motorized 10ft dish :crowdbounce

RamboHack
Monterrey, Mexico

Now, get some good string that can stretch a little tight from a local store, and string the dish tight like the cross-hairs on a rifle scope. Top to bottom, then another one from side to side. Make SURE the two strands lightly touch at the center. IF they do NOT, you will need to adjust the panels to get them to do so. Do NOT add the lnb arms to the dish until you perform this exercise and get it right.

By far the easiest way to do this, is if you have a large enough completely flat area, and you remove the reflector from the mount, and lay it upside DOWN on that flat surface. Just like flipping a dog water bowl upside-down. Make sure all edges are flat all around. If not, loosen bolts and get them flat all around.
 
  • Like
Reactions: martin-f
Now, get some good string that can stretch a little tight from a local store, and string the dish tight like the cross-hairs on a rifle scope. Top to bottom, then another one from side to side. Make SURE the two strands lightly touch at the center. IF they do NOT, you will need to adjust the panels to get them to do so. Do NOT add the lnb arms to the dish until you perform this exercise and get it right.

By far the easiest way to do this, is if you have a large enough completely flat area, and you remove the reflector from the mount, and lay it upside DOWN on that flat surface. Just like flipping a dog water bowl upside-down. Make sure all edges are flat all around. If not, loosen bolts and get them flat all around.

Thank you Primestar31, i will perform the "string test" tomorrow or Friday.

Hope i'll pass the test, if not, a lot of work to do removing the bolts and nuts again :(
 
Status
Please reply by conversation.

Users Who Are Viewing This Thread (Total: 0, Members: 0, Guests: 0)

Who Read This Thread (Total Members: 7)

Top