Echostar dish rescued...
- Thread starter Jason S
- Start date
- Latest activity Latest activity:
- Replies 71
- Views 16K
You are using an out of date browser. It may not display this or other websites correctly.
You should upgrade or use an alternative browser.
You should upgrade or use an alternative browser.
- Status
- Please reply by conversation.
Those Von Weise units are really nice dish movers as I've got 3 of them and have done some refurb stuff and also modified a couple putting brass nuts in'em. I noticed that yours doesn't have a ball swivel type mount on the outer tube?? Would be a good idea to get one of those instead of that bolt deal that's on there now.
You'll need to use some sand paper to knock that surface rust off the inner tube to keep it from eating up that rubber seal. I try to keep a light coating of grease on mine to prevent the rust from coming back but it's something you'll need to do every so often to keep that under control.
One problem I've run up on recently is that the magnets inside the motor housing came loose in one and I had to figure out how to fasten them back in. There's a thread on here where I showed pics of that process in case you run into the same problem. So far I've seen TWO of these Von Weise mover motors do that.
If you need help with something on this just ask and I'll help you if I can. There's some stuff that I know that works and I can also tell you some stuff that doesn't.

Nice work JS! That is a Von-Wiese actuator. I would keep it & use it. They used different DC motor manufacturers. It's a reed switch unit and if put back in working order should last another long while. I rescued two from 20 year old dishes and they now purr like a kitten. They are far superior to most of the new cheaper made stuff.
when you took the back cover off the actuator was there a felt like gasket sealing it? It looks like yours didn't and suffered some water entrance & rusting. Both of mine did have the gasket. If not try to seal it up with something to keep the electrical connections dry.
when you took the back cover off the actuator was there a felt like gasket sealing it? It looks like yours didn't and suffered some water entrance & rusting. Both of mine did have the gasket. If not try to seal it up with something to keep the electrical connections dry.
when you took the back cover off the actuator was there a felt like gasket sealing it? It looks like yours didn't and suffered some water entrance & rusting. Both of mine did have the gasket. If not try to seal it up with something to keep the electrical connections dry.
What I'd done with mine is drill a small hole in the bottom of the limit switch cover to allow any water that enters to run out. Always mount a Von Weise with the MOTOR ON TOP and put that hole on the bottom of the cover. I've used a 1/16" drill for a couple of mine and one came with a 1/8" hole in it from the factory so anything in between would work. Jut don't make the hole large enough for "critters" to get in.
If you want a seal when one isn't present you could just smear some RTV over the joint AFTER you get it setup like you want it, ie, East and West limit switch settings. Once they are set then there's no reason to go back into it until it breaks or wears something out.
Another FYI, I've sealed them up with enamel paint and a small brush also by putting several coats on that seam.
Whatever works for you!

Making great progress!You'll be watching tv with it in no time!

Thanks, I'm looking forward to the final results (i.e., watching TV with it)!
You could replace the accordian boot with an old bicycle inner tube and band clamps.
Thank you for the idea. The factory boot is intact right now, we'll see what happens when I get to working on the motor. I may dig out an old inner tube just in case.
Nice work JS! That is a Von-Wiese actuator. I would keep it & use it. They used different DC motor manufacturers. It's a reed switch unit and if put back in working order should last another long while. I rescued two from 20 year old dishes and they now purr like a kitten. They are far superior to most of the new cheaper made stuff.
when you took the back cover off the actuator was there a felt like gasket sealing it? It looks like yours didn't and suffered some water entrance & rusting. Both of mine did have the gasket. If not try to seal it up with something to keep the electrical connections dry.
Thank you for the encouragement! If at all possible, I plan on using the motor. I'm planning on checking it out more thoroughly. Not much of a gasket left; Lone Gunman's ideas sound pretty effective though.
Those Von Weise units are really nice dish movers as I've got 3 of them and have done some refurb stuff and also modified a couple putting brass nuts in'em. I noticed that yours doesn't have a ball swivel type mount on the outer tube?? Would be a good idea to get one of those instead of that bolt deal that's on there now.
You'll need to use some sand paper to knock that surface rust off the inner tube to keep it from eating up that rubber seal. I try to keep a light coating of grease on mine to prevent the rust from coming back but it's something you'll need to do every so often to keep that under control.
One problem I've run up on recently is that the magnets inside the motor housing came loose in one and I had to figure out how to fasten them back in. There's a thread on here where I showed pics of that process in case you run into the same problem. So far I've seen TWO of these Von Weise mover motors do that.
If you need help with something on this just ask and I'll help you if I can. There's some stuff that I know that works and I can also tell you some stuff that doesn't.
Thank you for the information and offer to help. I already have a few questions...
The ball pivot you mentioned (I haven't looked for anything like that yet), but would that be a new bracket with a ball pivot built in or would it be a piece that can be retrofitted or bolted onto the exisisting bracket? It seems like I've seen those ball pivots with something like a three bolt plate.
I've read through your thread on the motor magnets and took note. I'll listen for any abnormal grinding noises when I start testing it out and go from there.
How about lubing the internal parts on the jack itself? Are there any special tips or suggestions?
What I'd done with mine is drill a small hole in the bottom of the limit switch cover to allow any water that enters to run out. Always mount a Von Weise with the MOTOR ON TOP and put that hole on the bottom of the cover. I've used a 1/16" drill for a couple of mine and one came with a 1/8" hole in it from the factory so anything in between would work. Jut don't make the hole large enough for "critters" to get in.
If you want a seal when one isn't present you could just smear some RTV over the joint AFTER you get it setup like you want it, ie, East and West limit switch settings. Once they are set then there's no reason to go back into it until it breaks or wears something out.
Another FYI, I've sealed them up with enamel paint and a small brush also by putting several coats on that seam.
Whatever works for you!
Again, thank you for the info! I haven't checked for a weep hole on my cover yet; if none then I think thats a very good idea to go ahead and add one.
I was also thinking that applying a thin layer of automotive RTV on the edge of the cover and allowing it to throughly dry before reassembly might also work to seal the cover.
Weather and temperature-wise, today is a much nicer than yesterday. Maybe this afternoon I'll be able to make some progress...
So a little bit of progress this evening...
I was able to scrounge up some perforated aluminum to patch the hole. If it all actually works, I may have to take up Turbosat's kind offer and replace some of the worse panels. Here are several photos of the completed mesh refurbishment. Some with flash, some without and varying angles. BTW, the dish is leaned over in the polar mount. My OCD-ness made me put the new mesh at the bottom of the dish (center of mount if pointed due south)
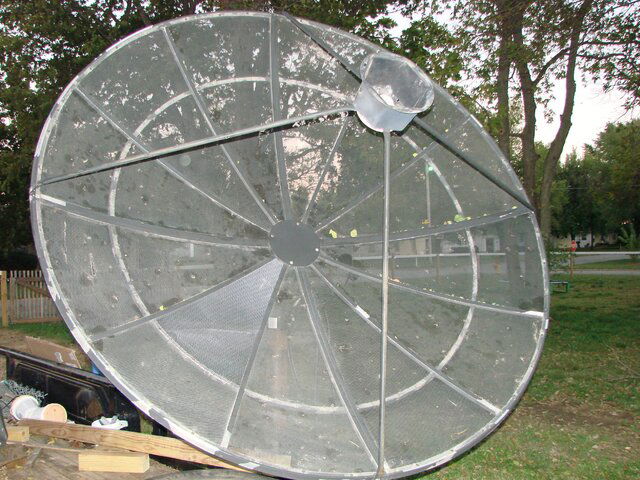
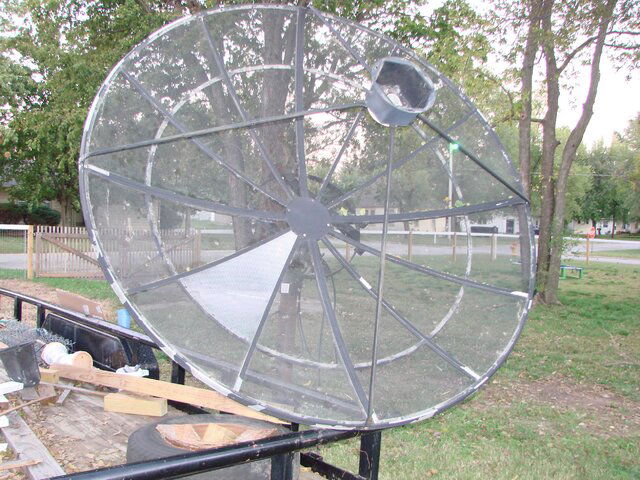
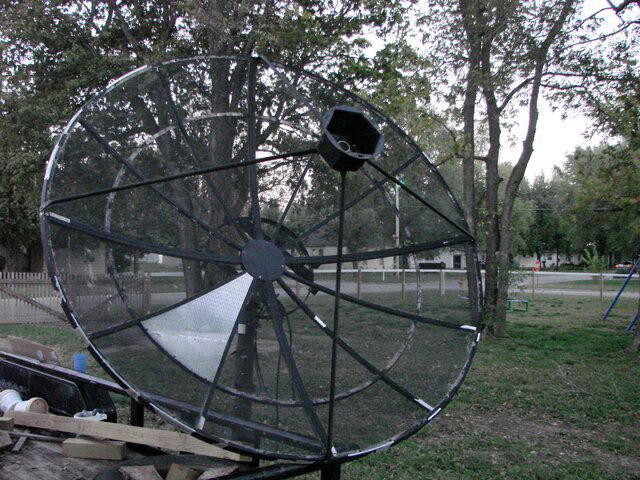
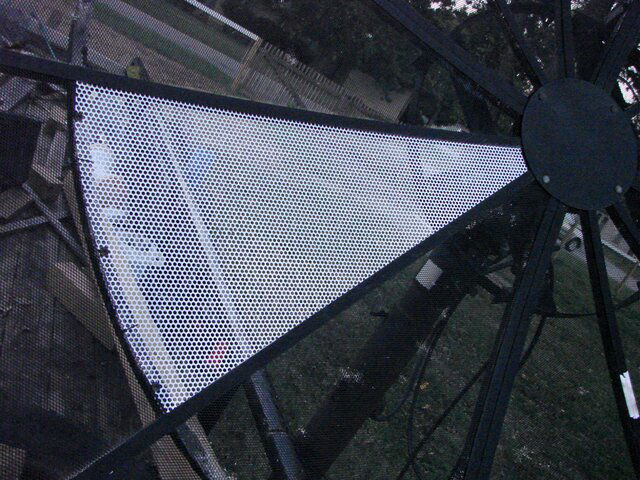
Later plans are to find some thin gauge aluminum wire to stitch some of the torn areas. I had tried some wire from aluminum screen mesh, but it was too thin and brittle. Thin gauge steel wire pulled from chicken wire was a bit thick, so I'll keep looking.
If the weather stays nice, I plan to give the dish another wash down and remove any larger flaking paint and try to get some paint on the thing.
I was able to scrounge up some perforated aluminum to patch the hole. If it all actually works, I may have to take up Turbosat's kind offer and replace some of the worse panels. Here are several photos of the completed mesh refurbishment. Some with flash, some without and varying angles. BTW, the dish is leaned over in the polar mount. My OCD-ness made me put the new mesh at the bottom of the dish (center of mount if pointed due south)


Later plans are to find some thin gauge aluminum wire to stitch some of the torn areas. I had tried some wire from aluminum screen mesh, but it was too thin and brittle. Thin gauge steel wire pulled from chicken wire was a bit thick, so I'll keep looking.
If the weather stays nice, I plan to give the dish another wash down and remove any larger flaking paint and try to get some paint on the thing.
Picture hanging wire is appropriate to stitch ripped satellite panels. Works perfectly.
No need for it to be made out of aluminum.
No need for it to be made out of aluminum.
Echostar dishes were made by KTI and some by Channel Master. What you have there is made by KTI and it is a 7.5'
View attachment 101993
I have a 10 footer that was made by unimesh. I believe Sami and perfect 10 were used as well. Most dishes where kind of generic when bundled with a receiver.
Electric fence wire is perfect for sewing torn places and cheap.
http://t.homedepot.com/p/Fi-Shock-250-ft-17-Gauge-Aluminum-Wire-FW-00018D/203415847/
http://t.homedepot.com/p/Fi-Shock-250-ft-17-Gauge-Aluminum-Wire-FW-00018D/203415847/
Nice mount. Bolt it to your trailer and you'll have a portable C-band dish to take camping!
Nice trailer too... could use one like that...
Now that's a tailgater! Take it camping, to a football game...etc! Guaranteed to be a great conversation piece, especially when everyone has a few beers! LOL That's a good looking mount too!!! Congrats on the rescue!!!
Picture hanging wire is appropriate to stitch ripped satellite panels. Works perfectly.
No need for it to be made out of aluminum.
The picture wire was the ideal solution! Thank you very much!
I have a 10 footer that was made by unimesh. I believe Sami and perfect 10 were used as well. Most dishes where kind of generic when bundled with a receiver.
I appreciate the input. Other than an extremely faded (barely readable) spot on the LNB housing and the post from DK_Sat, I don't know much about the dish. I'm finding out more and more as I delve deeper into this hobby (that's what we'll call it right now...).
Electric fence wire is perfect for sewing torn places and cheap.
http://t.homedepot.com/p/Fi-Shock-250-ft-17-Gauge-Aluminum-Wire-FW-00018D/203415847/
Thank you for the post! I had thought about that and actually have some similar aluminum hot wire (albeit from Lowes). I about used that in a 'hog ring' fashion for the repairs. However, I had it in my head that I wanted a fine gauge wire to thread through the torn areas, especially since this is pretty thin gauge expanded aluminum (0.032" which is about 20 gauge). I believe that if I'd used the aluminum hot wire to close up torn areas prior to my 'flattening' attempt, then that would probably be a better repair overall.
Now that's a tailgater! Take it camping, to a football game...etc! Guaranteed to be a great conversation piece, especially when everyone has a few beers! LOL That's a good looking mount too!!! Congrats on the rescue!!!
Thanks for the congrats! As I do more research, I'm quite happy with the rescue... I had talked to enough people that had donated their dishes to others to "make a gazebo..." If I get some experience under my belt, a tailgating C-band might be an actuality. As it is, with two 1.2m Ku dishes and now this C-band dish, I would imagine the neighbors are having a few conversations on their own!
Today's update:
There were many, very appreciated posts, on repairing torn mesh.
I went with the picture hanger wire idea for these repairs.
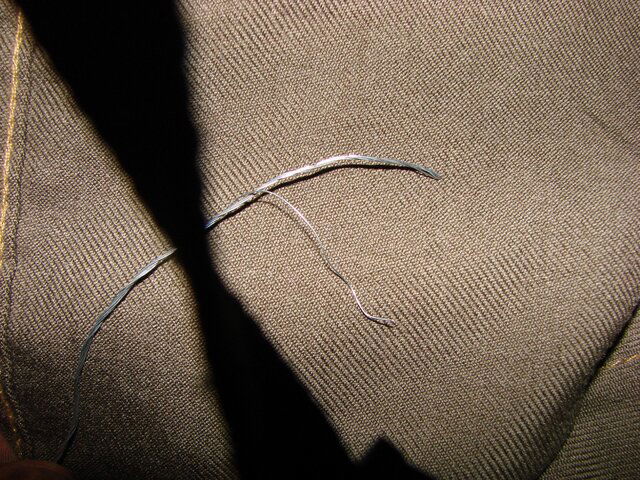
I separated out a single wire of suitable length from the strand and cut it off. Then I stitched the torn areas back together. Below are a few examples.
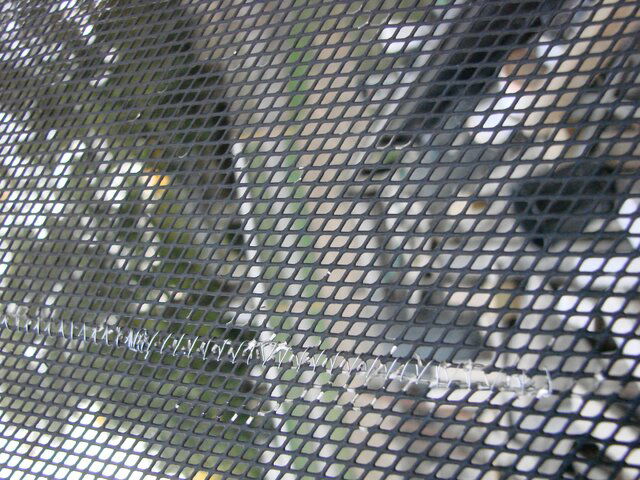
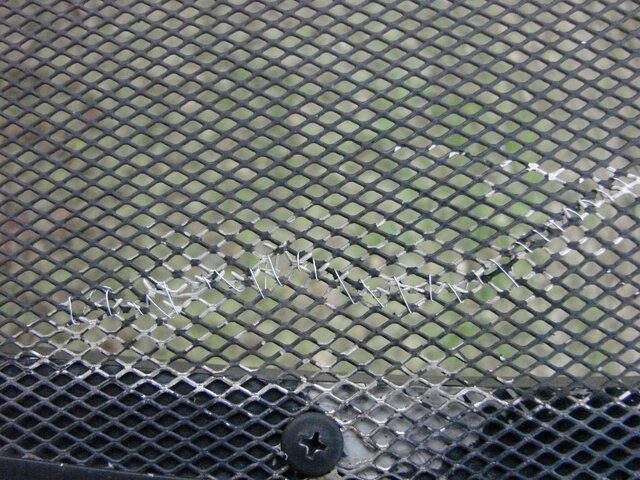
Additionally, I painted the dish this evening. However, it was awfully dark by the time I called it quits. I will have to see what areas I missed tomorrow during daylight.
There were many, very appreciated posts, on repairing torn mesh.
I went with the picture hanger wire idea for these repairs.

I separated out a single wire of suitable length from the strand and cut it off. Then I stitched the torn areas back together. Below are a few examples.


Additionally, I painted the dish this evening. However, it was awfully dark by the time I called it quits. I will have to see what areas I missed tomorrow during daylight.
You will be pleasantly surprised on how the patched panel disappears after shooting with the black paint.
Everything, including the patched area, was looking much better with paint but I ran out of daylight... I hope to have some photos of the freshly painted dish tomorrow.
Looks like you have done a fine job.
If you haven't done so all ready, you might want to get your post ready to accept the dish. Seeing how the post is made, I'm assuming you are going with a slab. If you get it done now, it should have time to cure well before you want to use it. Just a thought to help mitigate "The I really want to see this thing in action." desires.
Congratulations on the fine work.
Looks like you have done a fine job.
If you haven't done so all ready, you might want to get your post ready to accept the dish. Seeing how the post is made, I'm assuming you are going with a slab. If you get it done now, it should have time to cure well before you want to use it. Just a thought to help mitigate "The I really want to see this thing in action." desires.
Congratulations on the fine work.
Thank you very much!
As for the concrete work, I'm right there with you... I picked up some of the material yesterday. I plan to work on the digging today and maybe have the concrete in by tomorrow (maybe).
- Status
- Please reply by conversation.
Similar threads
- Replies
- 5
- Views
- 1K
- Replies
- 8
- Views
- 1K
- Replies
- 0
- Views
- 711
- Replies
- 12
- Views
- 1K

