One of the neat things about DISH hardware is its flexibility. For well over a decade, DISH has had the ability to add external hard drives to their receivers, turning them into single-tuner DVRs. While one tuner may not give you all the recording capabilities you need, it can be perfect for a receiver on a road trip. You can load up the hard drive with content while you’re at home and take both the receiver and hard drive with you. Connect the receiver to a portable satellite dish and you’ll get the best of live and recorded TV, even if there’s no internet service where you are.
First, you’ll need a Wally. This is DISH’s single-tuner receiver. If you plan on using it at home with your Hopper DVR, you may need some additional wiring. The diagram below shows the approved, stable way to have a mixed Hopper/Wally installation in your home.
Hopper-3-and-Wally
Click here to view full-screen or download.
With your Wally in place, you’ll need a portable hard drive. Virtually any one will do as long as it meets the following criteria:
As I said, pretty much any hard drive out there can work. Depending on the hard drive you may need to make a change or two, but it’s pretty easy.
It’s much more common today to find USB 3.0 hard drives rather than USB 2.0 ones. However, a USB 3.0 hard drive should be backwards compatible with USB 2.0, so it shouldn’t be a problem.
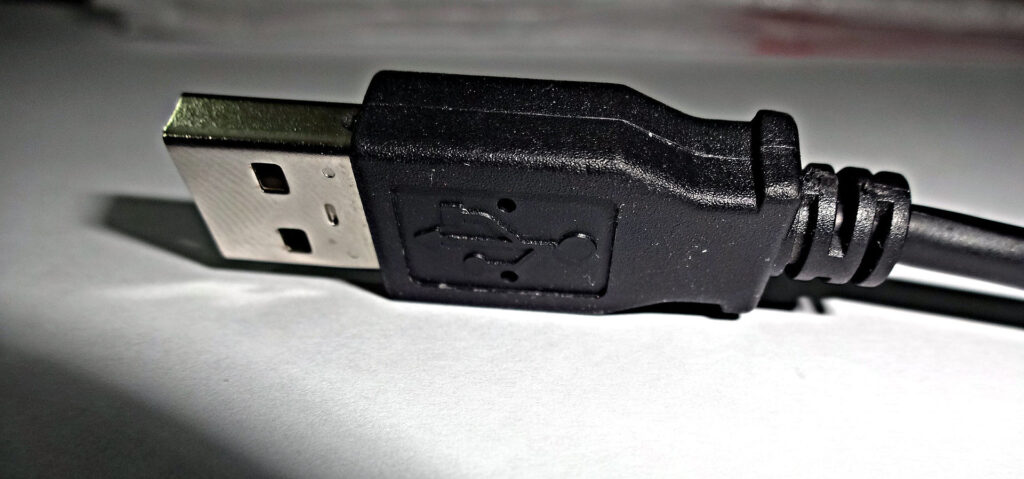
The hard drive must have the standard type-A connector on it:

but if it has a different connector you can usually get an adapter.
There is a size limit of 1TB for the drive. It shouldn’t be hard to find one that size. If you get a larger hard drive, you can use a partitioning utility on Windows to set the active partition size to 1TB and it should work (no promises here.)
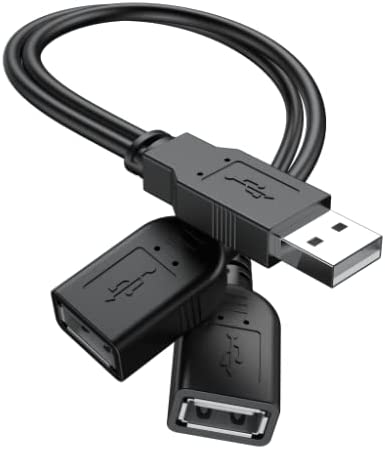
It’s much more common for hard drives to be USB-powered, but the Wally doesn’t supply enough current to let them work consistently. If you can’t find a hard drive you like with an external power supply, you can find an adapter like this:

Adapters like this one are easy to find all over the internet. Connect the hard drive’s power cable to one female port and a USB-A to USB-A cable to the other. You can then use any phone charger to power your hard drive.
There are a lot of hard drives out there and a lot of other options. For the most part, they work just fine. All you need to do is connect one to your Wally and it will “just work.” You can try SSDs if you wish, although they don’t bring any real benefit. If one hard drive doesn’t work for you, there are plenty of others out there.
The post The quick guide to adding DVR service to your Wally appeared first on The Solid Signal Blog.
Continue reading...
What you’ll need to know
First, you’ll need a Wally. This is DISH’s single-tuner receiver. If you plan on using it at home with your Hopper DVR, you may need some additional wiring. The diagram below shows the approved, stable way to have a mixed Hopper/Wally installation in your home.
Hopper-3-and-Wally
Click here to view full-screen or download.
With your Wally in place, you’ll need a portable hard drive. Virtually any one will do as long as it meets the following criteria:
- USB 2.0 compatible
- Under 1TB
- External power supply
Finding the right hard drive
As I said, pretty much any hard drive out there can work. Depending on the hard drive you may need to make a change or two, but it’s pretty easy.
USB Compatibility
It’s much more common today to find USB 3.0 hard drives rather than USB 2.0 ones. However, a USB 3.0 hard drive should be backwards compatible with USB 2.0, so it shouldn’t be a problem.
The hard drive must have the standard type-A connector on it:

but if it has a different connector you can usually get an adapter.
Size/Capacity
There is a size limit of 1TB for the drive. It shouldn’t be hard to find one that size. If you get a larger hard drive, you can use a partitioning utility on Windows to set the active partition size to 1TB and it should work (no promises here.)
External Power Supply
It’s much more common for hard drives to be USB-powered, but the Wally doesn’t supply enough current to let them work consistently. If you can’t find a hard drive you like with an external power supply, you can find an adapter like this:

Adapters like this one are easy to find all over the internet. Connect the hard drive’s power cable to one female port and a USB-A to USB-A cable to the other. You can then use any phone charger to power your hard drive.
“No promises” but…
There are a lot of hard drives out there and a lot of other options. For the most part, they work just fine. All you need to do is connect one to your Wally and it will “just work.” You can try SSDs if you wish, although they don’t bring any real benefit. If one hard drive doesn’t work for you, there are plenty of others out there.
The post The quick guide to adding DVR service to your Wally appeared first on The Solid Signal Blog.
Continue reading...

