If you’re updating your DIRECTV system, you might need an external multiswitch. Today’s DIRECTV dishes can support up to 13 tuners (meaning 13 receivers, a Genie and 6 receivers, or some other mix) but that may not be enough for you. For commercial customers or home theater fans, you may need more.
It’s easy to upgrade to a more powerful system if you know how to hook it up, but DIRECTV systems are designed for installers who already know what they’re doing. Luckily we’re here to help.

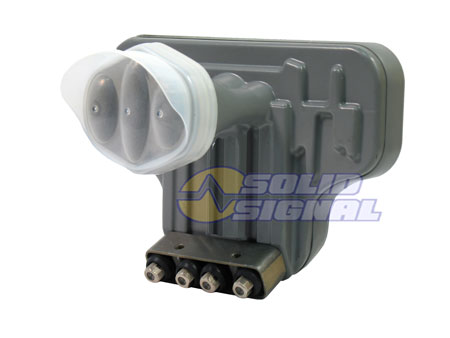
You’ll know that you have a legacy LNB if you look at it and it has four connections at the bottom. The more common “SWM” version only has one line but it’s not upgradeable. These four-line versions are in short supply, rarely seen anymore since they haven’t been made in several years. Yet, if you have one, they will continue to work.
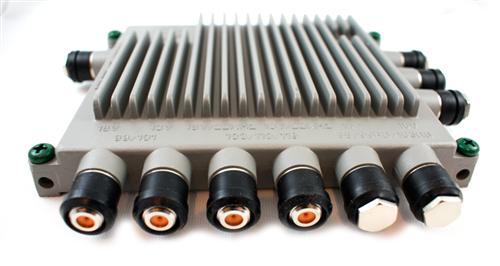
Legacy dishes can be connected to older multiswitches or the current model SWM-30. In both cases you want to connect the four lines from the dish to the leftmost four inputs at the bottom of the multiswitch.

It doesn’t matter which line from the dish goes into which port. Each line from the dish is capable of supplying all the signals needed by all four lines. Once it’s connected it just automatically works.
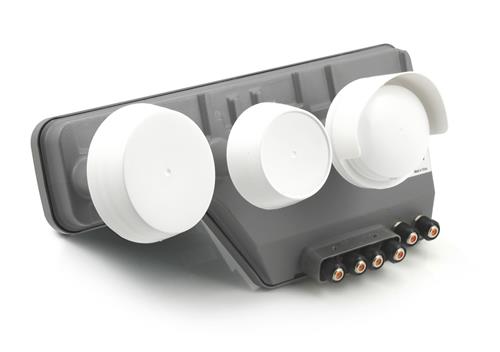
If you want a futureproof setup, or if you’re in any commercial environment, you’ll want the Reverse Band 5 Legacy LNB. It will let you get 4K and all the other programming DIRECTV has. It will also work with all existing HD equipment. This LNB has six lines coming from it.

Installation isn’t too different from the legacy version. The first four lines can go in one of the four open ports on the left. Commercial installers should use a polarity locker, though, and when you do that you will have to be more careful to run line 1 from the locker into the left port on the multiswitch, line 2 into the next port, etc.
You must connect the fifth line from the dish MUST into port#5. This port is labeled “18V/95 or 99RB.” You must also connect the sixth line into port#6, the rightmost port. If you don’t hook these into the correct port on the multiswitch, the system won’t work right. You’ll know you have it wrong if the receivers boot up and tell you there’s an error with the dish.
Solid Signal has published the “Ultimate Guide to Upgrading,” the top tutorial on the subject. It shows you all the possible choices for upgrades to your DIRECTV system. You’ll see all the current parts, everything you’ll need, and there are helpful diagrams to help you wire everything properly. It’s completely free to download, and has been downloaded over 200,000 times! If you need personalized attention, call the experts at Solid Signal. We’re here during East Coast business hours at 888-233-7563.
The post NICE AND EASY: Which lines from the dish go into which ports on the multiswitch? appeared first on The Solid Signal Blog.
Continue reading...
It’s easy to upgrade to a more powerful system if you know how to hook it up, but DIRECTV systems are designed for installers who already know what they’re doing. Luckily we’re here to help.
Traditional “Legacy” dishes

You’ll know that you have a legacy LNB if you look at it and it has four connections at the bottom. The more common “SWM” version only has one line but it’s not upgradeable. These four-line versions are in short supply, rarely seen anymore since they haven’t been made in several years. Yet, if you have one, they will continue to work.
Legacy dishes can be connected to older multiswitches or the current model SWM-30. In both cases you want to connect the four lines from the dish to the leftmost four inputs at the bottom of the multiswitch.

It doesn’t matter which line from the dish goes into which port. Each line from the dish is capable of supplying all the signals needed by all four lines. Once it’s connected it just automatically works.
Using the latest Reverse Band dish
If you want a futureproof setup, or if you’re in any commercial environment, you’ll want the Reverse Band 5 Legacy LNB. It will let you get 4K and all the other programming DIRECTV has. It will also work with all existing HD equipment. This LNB has six lines coming from it.

Installation isn’t too different from the legacy version. The first four lines can go in one of the four open ports on the left. Commercial installers should use a polarity locker, though, and when you do that you will have to be more careful to run line 1 from the locker into the left port on the multiswitch, line 2 into the next port, etc.
You must connect the fifth line from the dish MUST into port#5. This port is labeled “18V/95 or 99RB.” You must also connect the sixth line into port#6, the rightmost port. If you don’t hook these into the correct port on the multiswitch, the system won’t work right. You’ll know you have it wrong if the receivers boot up and tell you there’s an error with the dish.
Need even more help?
Solid Signal has published the “Ultimate Guide to Upgrading,” the top tutorial on the subject. It shows you all the possible choices for upgrades to your DIRECTV system. You’ll see all the current parts, everything you’ll need, and there are helpful diagrams to help you wire everything properly. It’s completely free to download, and has been downloaded over 200,000 times! If you need personalized attention, call the experts at Solid Signal. We’re here during East Coast business hours at 888-233-7563.
The post NICE AND EASY: Which lines from the dish go into which ports on the multiswitch? appeared first on The Solid Signal Blog.
Continue reading...

