OK, I have seen several people asking how to load their new Openbox receivers using the editor, so here is as simple a way as I can manage to help you.
Advanced users, would you please add to this so it will be easier for all people to use. I am only beginning at this and there is a LOT I don't know (yet) but I am willing to learn.
First you'll have to dump your *.asb file to a memory stick. I don't think it matters what size stick you use. I am using one that is only 64M that I received with a CNX DUO several years ago. It's small but does the job nicely.
Go to your menu on the Openbox, the fourth item down on the left side is a brief case, click on that.
On the right side you'll see several options, the second from the bottom is "Dump by USB."
If you don't see this listed, you have an older file on your receiver and will have to find and load a newer file. I think from information I have seen, this was added sometime around May 2010.
Highlight and click "OK" to open.
At the top of the next screen you will see highlighted … DUMP MODE MISC FILES.
Click once to the right or left and you will see … DUMP MODE IMAGE FILES(*abs)
You want the image files highlighted here.
Click START
You will see two options, the HDS2_DUMP . ABS(image) file is the first, click the "OK" button on your remote. This will leave a blue check mark next to the file you want to dump. Now click the yellow button on your remote. The dump will go to your USB device, stick or hard drive.
Click "EXIT" once.
Drop down one item to "Remove USB Device Safely."
After downloading is complete, click "Exit" on your remote twice, this will get you back to your TV programming on your receiver.
Remove USB Device and go to your computer.
Elbandido has been very helpful with giving us several different versions of the editor, I will try to add a copy of one of them at the end of this tutorial, but if I don't have it there, do a search on any of several forums, including this one for "Openbox S9 Software" and you will have the editor. My intention here is not to give the software, but how to use it.
Before you get to far into this, the very first thing you may want to do it copy and save the file from your USB devise to a safe place on your computer. Once saved, feel confidant enough about yourself to go ahead with the following instructions.
Download and unzip the editor.
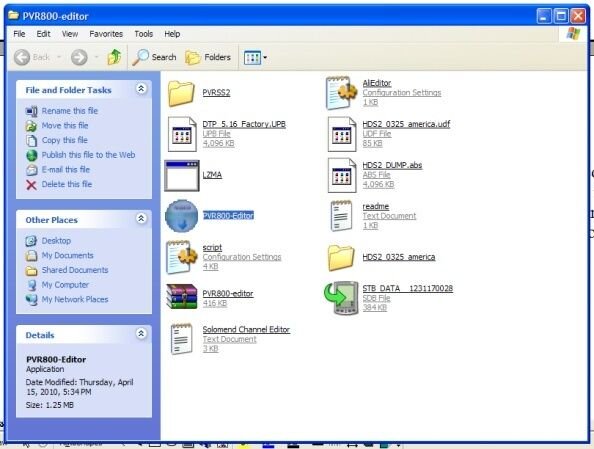
Open the Editor.
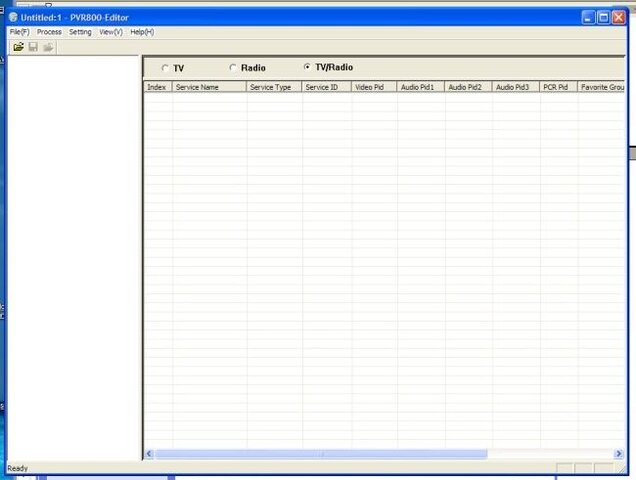
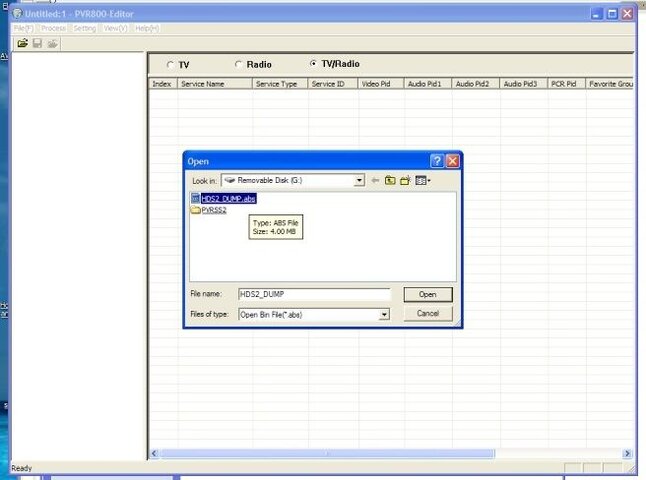
On the top row, under "File (F)" there is a small yellow folder, click on this to open the folder.
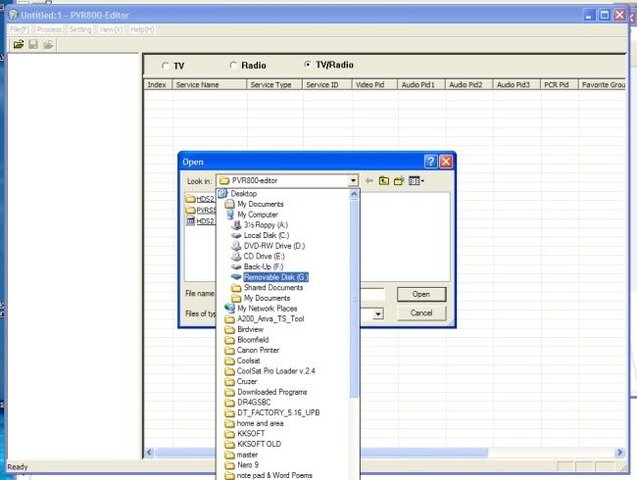
Find the file you want to open. In my case I still had the file on the USB stick, so I opened the stick, and then changed the "Files of Type" to "Open Bin File (*.abs)"
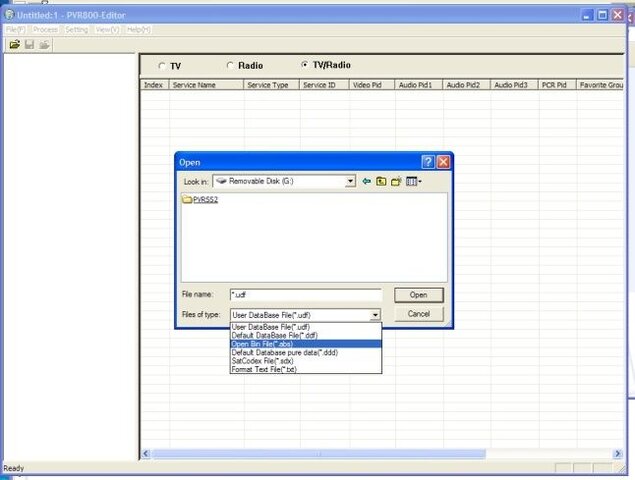
Highlight "HDS2 DUMP .abs" and click "Open."
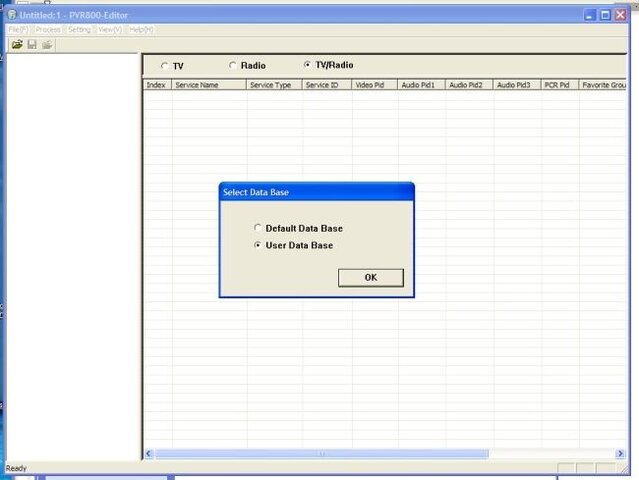
This will open "Select Data Base." Here we want to check the radio button for the second option "User Data Base." Click OK.
Now you will see the editor has added two items in the top left corner, "+ All Services" and "+ Favorite Groups."
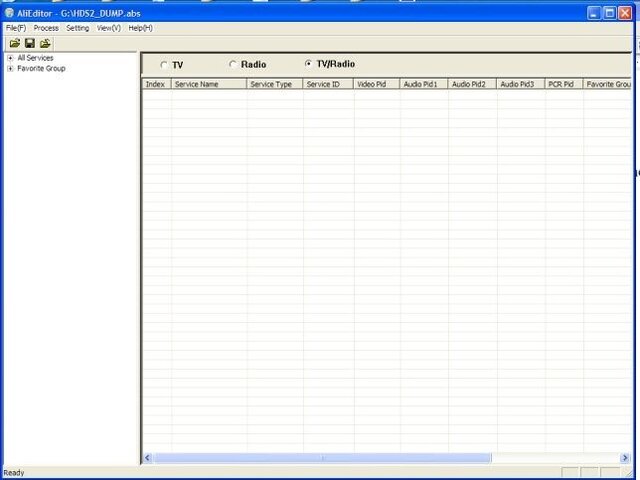
Here you can open All Services (by clicking on it) OR click on just the "+" button to the left of "All Services." To make things easier here (you can experiment later if you want), click on the "+" you will have a new "+ Satellite Information" and THIS is where we want to be.
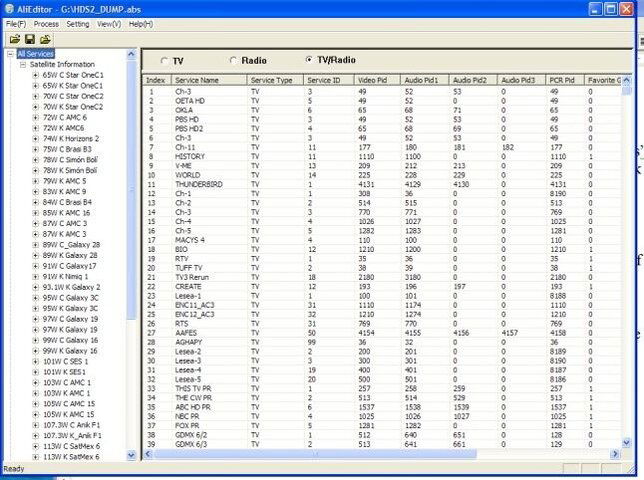
Click on the "+" in front of Satellite Information, this will open the entire list of satellites on your receiver.
Now lets stop here for just a moment. On this page, you can rename satellites, or rearrange them, delete unwanted satellites, start experimenting here and you may have a lot of fun.
The biggest problem seems to be wanting to add the CWs to the satellite list, so that's where we are heading.
Find the 91W C Band Satellite. Left click on this satellite and go to "add information."
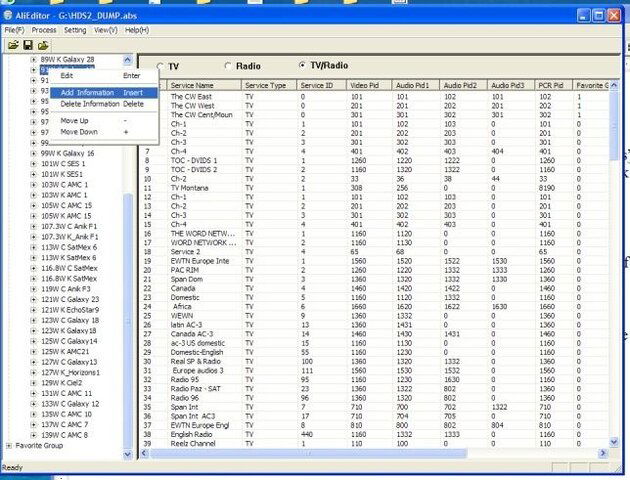
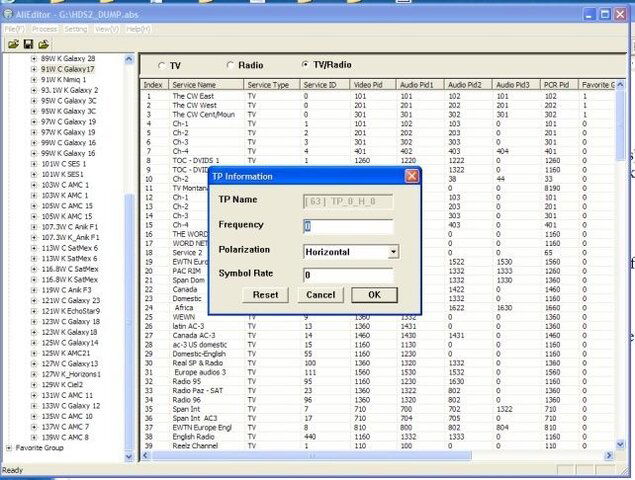
In the box that opens, add the Frequency, Polarity and Symbol rate of the channel you want to add. For CW East that would be 3720, Horizontal, and 26700. and click OK.
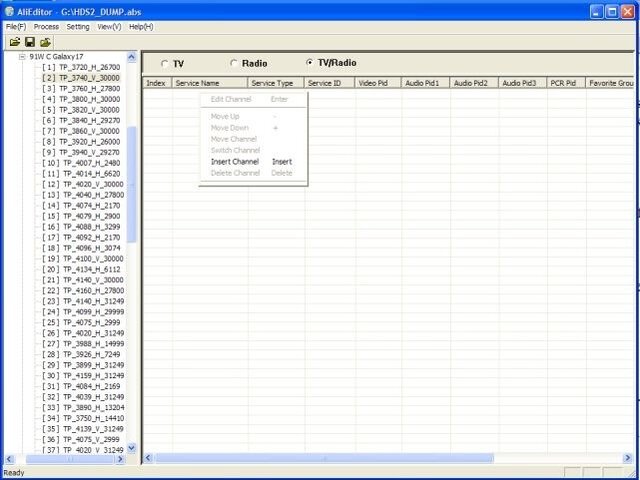
Go to the new transponder you just added to the list under your satellite and click on that. On my example I already had the CWs loaded so I created a new channel by changing the SR to 30000, rather than the correct 26700, did you catch that? Other than the SR, everything else here will now be the same.
Go to the large white field to the right of the list of satellites and left click anywhere. You will open a dialogue box, scroll down to "insert channel." Fill in the information for pids and name the channel.
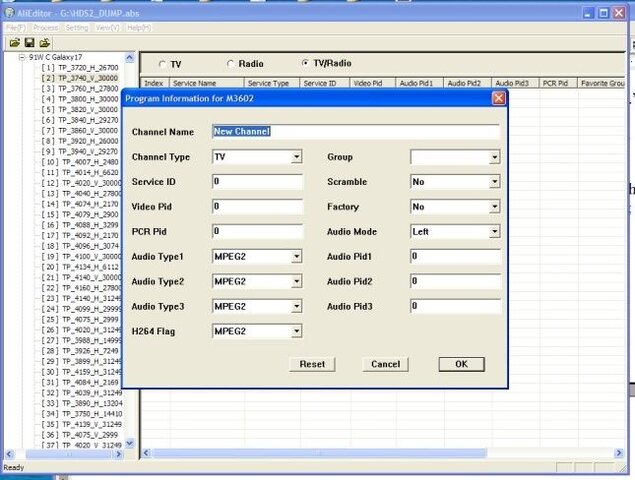
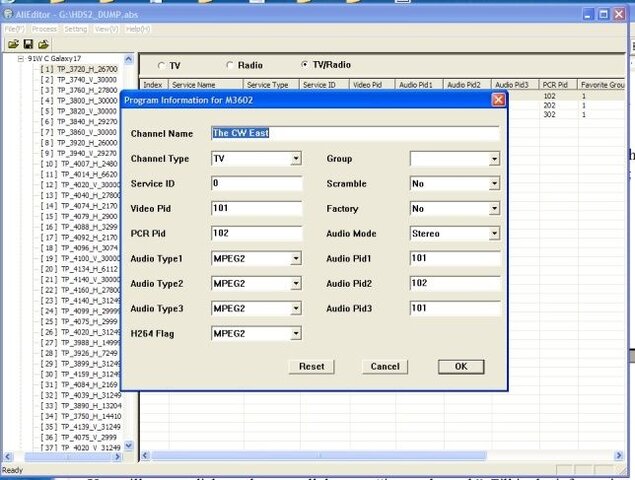
That's it, you now have CW on your lineup.
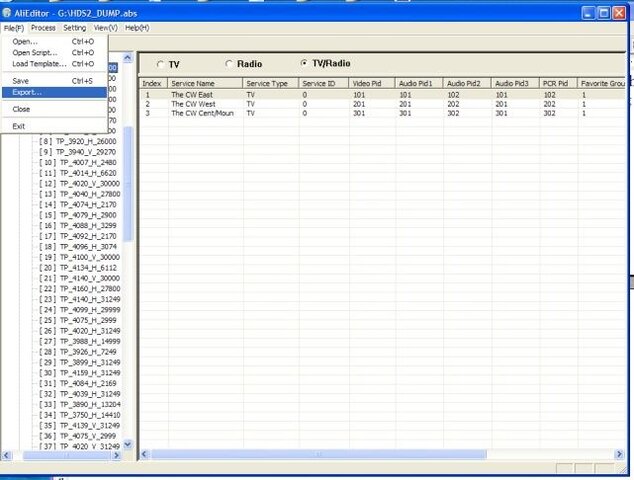
Go to the "File(F)" at the top left corner and click, scroll down to "Export."
In the "Save As" box, scroll down to the "Open Bin File (*abs)" and click on the existing "HDS2 Dump .abs" listed. A box will open telling you that that file already exists, do you want to replace it. Click "Yes" and you are done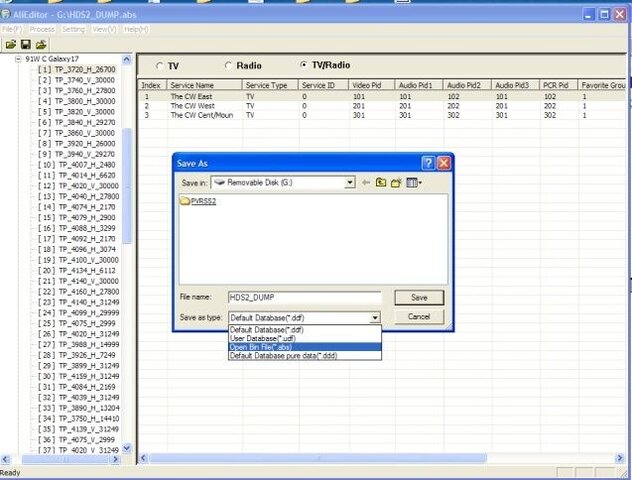
Extract the USB devise from your computer and take it to your receiver.
Put the USB devise into your receiver, go back to the screen where you dumped to the USB devise, and click on UPGRADE BY UBS.
Once you click on that you will open a screen that allows you to upgrade your *.abs file.
Now, Here is where I could use some help from the other experts.
Every time I have done this I have been extremely happy with the results, except for one thing. I have had to go back and reset the motor controls. I have tried dumping everything to the stick before adding transponders or anything, then when I go back I find that uploading the *.abs file changed something, I'm not sure what, but it is relativly easy to go through and change the motor settings.
Other than that small price, this is all you need for getting the CW's on your Openbox.
Photto
Advanced users, would you please add to this so it will be easier for all people to use. I am only beginning at this and there is a LOT I don't know (yet) but I am willing to learn.
First you'll have to dump your *.asb file to a memory stick. I don't think it matters what size stick you use. I am using one that is only 64M that I received with a CNX DUO several years ago. It's small but does the job nicely.
Go to your menu on the Openbox, the fourth item down on the left side is a brief case, click on that.
On the right side you'll see several options, the second from the bottom is "Dump by USB."
If you don't see this listed, you have an older file on your receiver and will have to find and load a newer file. I think from information I have seen, this was added sometime around May 2010.
Highlight and click "OK" to open.
At the top of the next screen you will see highlighted … DUMP MODE MISC FILES.
Click once to the right or left and you will see … DUMP MODE IMAGE FILES(*abs)
You want the image files highlighted here.
Click START
You will see two options, the HDS2_DUMP . ABS(image) file is the first, click the "OK" button on your remote. This will leave a blue check mark next to the file you want to dump. Now click the yellow button on your remote. The dump will go to your USB device, stick or hard drive.
Click "EXIT" once.
Drop down one item to "Remove USB Device Safely."
After downloading is complete, click "Exit" on your remote twice, this will get you back to your TV programming on your receiver.
Remove USB Device and go to your computer.
Elbandido has been very helpful with giving us several different versions of the editor, I will try to add a copy of one of them at the end of this tutorial, but if I don't have it there, do a search on any of several forums, including this one for "Openbox S9 Software" and you will have the editor. My intention here is not to give the software, but how to use it.
Before you get to far into this, the very first thing you may want to do it copy and save the file from your USB devise to a safe place on your computer. Once saved, feel confidant enough about yourself to go ahead with the following instructions.
Download and unzip the editor.

Open the Editor.

On the top row, under "File (F)" there is a small yellow folder, click on this to open the folder.

Find the file you want to open. In my case I still had the file on the USB stick, so I opened the stick, and then changed the "Files of Type" to "Open Bin File (*.abs)"

Highlight "HDS2 DUMP .abs" and click "Open."

This will open "Select Data Base." Here we want to check the radio button for the second option "User Data Base." Click OK.

Now you will see the editor has added two items in the top left corner, "+ All Services" and "+ Favorite Groups."

Here you can open All Services (by clicking on it) OR click on just the "+" button to the left of "All Services." To make things easier here (you can experiment later if you want), click on the "+" you will have a new "+ Satellite Information" and THIS is where we want to be.

Click on the "+" in front of Satellite Information, this will open the entire list of satellites on your receiver.
Now lets stop here for just a moment. On this page, you can rename satellites, or rearrange them, delete unwanted satellites, start experimenting here and you may have a lot of fun.
The biggest problem seems to be wanting to add the CWs to the satellite list, so that's where we are heading.
Find the 91W C Band Satellite. Left click on this satellite and go to "add information."


In the box that opens, add the Frequency, Polarity and Symbol rate of the channel you want to add. For CW East that would be 3720, Horizontal, and 26700. and click OK.

Go to the new transponder you just added to the list under your satellite and click on that. On my example I already had the CWs loaded so I created a new channel by changing the SR to 30000, rather than the correct 26700, did you catch that? Other than the SR, everything else here will now be the same.
Go to the large white field to the right of the list of satellites and left click anywhere. You will open a dialogue box, scroll down to "insert channel." Fill in the information for pids and name the channel.


That's it, you now have CW on your lineup.
Go to the "File(F)" at the top left corner and click, scroll down to "Export."

In the "Save As" box, scroll down to the "Open Bin File (*abs)" and click on the existing "HDS2 Dump .abs" listed. A box will open telling you that that file already exists, do you want to replace it. Click "Yes" and you are done

Extract the USB devise from your computer and take it to your receiver.
Put the USB devise into your receiver, go back to the screen where you dumped to the USB devise, and click on UPGRADE BY UBS.
Once you click on that you will open a screen that allows you to upgrade your *.abs file.
Now, Here is where I could use some help from the other experts.
Every time I have done this I have been extremely happy with the results, except for one thing. I have had to go back and reset the motor controls. I have tried dumping everything to the stick before adding transponders or anything, then when I go back I find that uploading the *.abs file changed something, I'm not sure what, but it is relativly easy to go through and change the motor settings.
Other than that small price, this is all you need for getting the CW's on your Openbox.
Photto
Last edited:


